

The Wee Braw Bag - probably the most perfect project bag out there!
Perfectly round, reversible, plenty pockets, so versatile and ohhhh so cute. I can't even remember how many I made - but there've been a lot. It's my absolute go-to project if I need a quick little gift for my knitting mother-in-law or end of term teacher gifts. Ohhh and whenever there's another wee girls birthday party coming up, I love to make a Wee Braw Bag together with my daughter. She picks the fabric, helps me make the bag and then the best part - we fill it with all kind of treats! A personal gift yet made in absolute no time. Win win, my friend! That's what I am all about...
So, what do you think? Fancy making a Wee Braw Bag with me...? Let me show you exactly how I make them and I promise you will be super excited, bursting with confidence to create your very own version of the bag!
Shall we get started?

Disclosure: Some of the links below are affiliate links, meaning, at no additional cost to you, I may earn a small commission if you click through and make a purchase.
The pattern comes in two sizes - a small one and a large one. Both perfectly round when closed and oh so adorable. And I am always super surprised how roomy they are... I guess that's what makes them the perfect project bag for on-the-go! Knitting, Crocheting, EPP or hand quilting... whatever your crafty heart desires!


I hope you get an idea of the two different sizes!
Can you tell she struggled holding them up for you? Apparently they are very heavy if you fill them up with fabric... *oooopsie*

Again the large one above and the tiny one below...


About the Wee Braw Bag...
The Wee Braw Bag is not only the perfect project bag for your knitting bestie, swap partner or mother-in-law but also a great alternative to gift wrapping. I never, ever have gift wrapping at home. At least not the right one. Or is it ok to wrap Star Wars Lego for my sons bestie in Christmas tree paper... hmmm, maybe not?! But dang, I can definitely make a Wee Braw Bag in 20 minutes... I am sure you know the struggle.
But let me warn you, my friend - they are super addictive to make! You won't be able to stop at just one!!

Sewing Course
And of course - if you like to actually sew with me. Why not join my on-demand Sewing Course: Project Bag?! It's created in a way that you can make your very first item within one afternoon/ sitting. Binge watch the videos first or sew right alongside me.
Five easy to digest modules cover the basics of bag making before personalising your project bag in the bonus sections.
Level: beginner friendly!
Ok. Let't talk a little more about the Wee Braw Bag. Are you ready?
- The bag comes in two sizes - a wee one (measuring approx. 4.5"(w) x 4"(h) x 4" (d)) and a larger one (measuring approx. 6.5"(w) x 5.5"(h) x 5" (d)).
- They are super easy to make and you'll quickly pick up how they are constructed. At that point you can start customising. And that's where the fun starts!!! You can size them down, making a super tiny one, or up all the way. Or go for a more rectangular shape... Add pockets all the way around, add pockets to the inside or leave them out altogether. Did you know they are fully reversible as well? So whatever option you pick - you can totally make it your own!
- Or why not make a scrappy Wee Braw Bag, using up all those precious little scraps from your last project?! Or even better - use an orphan block that didn't make it into your last quilt and use it for the front pocket. Quilt your panels either by machine or hand - ahhh, there are literally no limits.
And if you're wondering about the pattern itself - let me tell you more about the actual pattern. Shall we start?
- The pattern is a digital file (PDF) and you can easily get your copy from my shop. After purchasing your copy it will be ready for instant download. Make sure to save it and you're ready to go. Super easy! The Wee Braw Bag is a measure and cut pattern, meaning all pattern pieces are cut using a rotary cutter, cutting mat and ruler. There is no need to print it unless you wish to do so, as there are no templates needed. So you can start today!
- The pattern is consisting of 5 pages, includes loads of pictures, detailed instructions and tables. I carefully talk you through, step-by-step. It's like I am sitting right next to you - cheering you on!! I know you can do it! I wrote the pattern with absolute beginners in mind but if you are a confident maker, I am sure you'll still love making one as well... or a dozen. Remember, I warned you. They are super addictive to make.
If you like to know more about teaching classes or your local guild, selling finished bags, need more information on buying, saving and printing the pattern - please hop over to my FAQs, there I try to answer all your questions in more detail.


Materials needed...
Before we start sewing, let's talk a little about the materials you'll need. Shall we?
First of all - you will need your copy of the pattern which you can find in my shop. Remember, it's a measure and cut pattern, meaning all pattern pieces are cut using a rotary cutter, cutting mat and ruler. No need to print anything, unless you wish to do so. So you can start straight away picking your fabric!
So here a list with all the things you'll need:
- Wee Braw Bag pattern
- Fabric
- Interfacing (optional)
- Cord
- Cotton tape (optional)
- Cord stoppers (optional)
- Thread
- Notions
- Sewing Machine
Fabric:
You will need fabric. Preferably your fave fabric ever, as I truly believe in always using the best. Why hoarding it when in fact you can make something pretty from it today!? I am sure you have plenty at home but of course, if you need an excuse to go fabric shopping - you go girl!
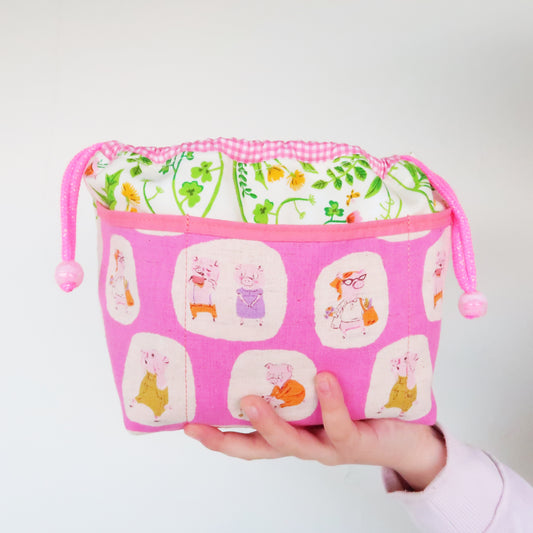
I used some of my most treasured prints for this Wee Braw Bag. A mix of some older lines by Heather Ross. The piggies are a super soft linen mix (super hard to find but I link you back to a similar one) and the floral is my most favourite basic print by Heather ever. Like ever ever! For the lining I used the classic pink strawberries and Kona cotton. And the casing is made of Heathers pink gingham, another classic if you'd asked me.
Interfacing:
To give your bag a little more structure, I recommend using fusible interfacing. Especially if you picked thinner fabric like Liberty lawn, Heather Ross' munki munki or linen. Most of the times I go without these days though, as I like my Wee Braw Bags to fold flat if I am not using them. But that's totally up to you!
Cord:
About cords. There are literally so many options out there. I like to use this shiny, slightly thicker cord for bags - making the cord a bit of a feature. But I am afraid this specific one I am using is a little tricky to source. A friend of mine in Tokyo is kind enough to send me some once a year and I can tell you, it's always the happiest of happy mail when they arrive. But there are so many other cute options our there. You could use some pre-made bias tape or go for it and make it yourself. Maybe using some of the fabric you already used for your Wee Braw Bag...? Or have a look into parachute cord, they come in various sizes and colours. How about cutting strips of your left over knit fabric or pre-made hoooked zpagetti. Seriously, there are so many options out there and I am sure you'll find something you'll love.
Cotton tape:
Cotton tape is absolutely optional. I rarely use it these days but if you fancy adding a little extra - go and add some pretty tape to the side of your bag.
Cord stoppers:
Again. Totally optional but I looove using cord stoppers or so called loop ends. And as I get the question allllll the time, let me tell you a little more about them. Just like the cord, I get my loop ends via my sweet friend in Japan but there are so many cute versions out there. How about cord locks that are usually used for hoodies - and dang, they come in great colours! Or have a look into beads, maybe from your kids arts + craft stash...? Just make sure the holes are big enough for the size of cord you're using (remember, you need two of them going through each cord stopper, lock or bead).
Thread:
When making a Wee Braw Bag, I am using two kinds of thread weight. For the construction of the bag I am using Aurifil 50wt in white - that's for steps like sewing the pocket panels together, attaching the casing, boxing out corners and the final assembly. Literally all the seams that have to last but are hidden at the inside of the bag. And for seams that will be seen later on - like the "faux" piping, the seams dividing your pockets or the topstitching at the very end - there I use Aurifil 28wt in a corresponding colour. I always make sure to use thread a couple shades lighter than the actual fabric, so that the thread nicely blends into the overall look of the bag. But no need to hide them, those seams are definitely a feature of your bag and deserve to be seen. So investing in a beautiful range of Aurifil 28wt in basic colours are so worth it if you'd ask me...!
Notions:
Next to basic sewing tools such as a self healing cutting mat, rotary cutter and ruler, I like using wonder clips instead of pins. They are just so much faster to use and I tend not to lose them as quickly. They are a bit of an investment but totally worth it if you like to spoil yourself. But of course, if you prefer pins - there are some wonderful pins out there going through fabric like butter...
When it comes to marking, I am using two different kind of tools. So if it's a visible mark, like the dividing seams on the front pocket, I am using my trusted Hera marker. It works a bit like a blunt butter knife and leaves a crease that you can trace, but disappears again without leaving an actual mark. And if the marks are at the inside of the bag or disappear into the seam allowance, like boxing out the corners, I am usually lazy and use a standard fabric marker. It's just faster and I don't need to look too closely to find the crease... I am all about saving time - can you tell?
My machine:
I am using my Janome MC 6700p - the p stands for professional!! And ohhh, she is amazing. Super reliable, a work horse and the seams are just plain gorgeous. She loves Aurifil - so she's a match made in heaven.
When it comes to making a Wee Braw Bag I love this one particular feature. I am using the HP foot and corresponding HP plate - which gives you the perfect 1/4" seam allowance. But when making this bag, you constantly have to swap between a 1/4" and 1/8" seam allowance. And here's the trick - keep your HP foot on throughout the whole project but only change the needle plate. So if you need a 1/4" seam allowance, use the corresponding HP plate. But if you quickly have to swap over to create an 1/8" seam allowance just pop in your standard needle plate and you're ready to go. Your needle automatically moves over a little to the right and you can start sewing straight away... Neat, right?
And finally let's talk about needles. Shall we? Don't be intimidated by this or think it's too technical for you. It's not... trust me. Ok, so I need my needles to be super reliable and go through plenty layers of fabric (and interfacing) without breaking or skipping a stitch. So basically I need a real strong needle. And that's why I always use a jeans needle (either in 90 or 100) when it comes to bag making. They easily glide through all layers and never let me down...

And now...
I warned you - making a Wee Braw Bag is super addictive! You won't be able to stop at just one... Kind of a natural law. Every time I am about to stitch the very last seam... in my head I am already going through fabric options for the next one. Every. Single. Time. But you can't say I didn't warn you, my friend.
But seriously. Now you know how to make the best project bag ever!! You will know all about inserting a drawstring mechanism and you can topstitch like a pro... why not attempt the next project?! How about the Glitta pouch...?? A girl can never have too many pouches and this one is just the cutest thing ever. Seriously. It actually sparkles! Head over to my post about the Glitta pouch, there I share all my best tips and tricks with you, fave materials and lots and lots of inspiraion. Are you ready...?

And of course, you can also find me over on Instagram or Facebook for more inspiration. Or check out my brand new Pinterest page!
And finally I like to take the chance to thank Janome UK for working with me. I love my Janome MC 6700p and don't want to miss her anymore... So thanks Team Janome for having me!
Take care and Happy Sewing
Love, Laura x
This blog post contains affiliate links, specifically I am a participant in the Amazon Services LLC Associates Program, an affiliate advertising program designed to provide a means for us to earn fees by linking to Amazon.com and affiliated sites. I will never post a link to a product I do not personally recommend. If you click on an affiliate link and then proceed to purchase something from that affiliated website, I receive a small commission. This helps me continue to provide high quality, free content. Please send me an email to laura@sweetcinnamonroses.com if you have any questions.
2 comments
Hi Diane, thanks so much for reaching out. The SewAlong is now finished but you can still find all the videos over in our free Facebook group (https://www.facebook.com/groups/sweetcinnamonrosespatterns). See you over there, Diane. L x
I purchased your pattern, pdf. I’m so excited to sew along with you but can’t seem to find access to your video in the above story. Help! Thank you, Diane