
Amazing news!
I am so excited to introduce you to my brand new pattern.
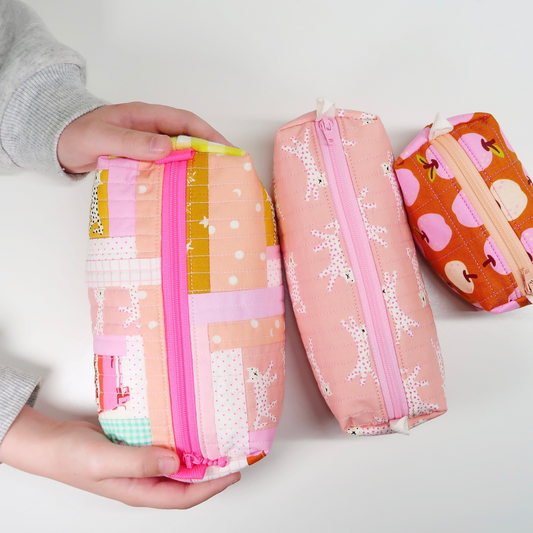
... *drum rolls please* ... the Quilted Boxy Pouch.


Disclosure: Some of the links below are affiliate links, meaning, at no additional cost to you, I may earn a small commission if you click through and make a purchase.
But let me share a little more with you...
All the time I get asked if my patterns are too hard? Too hard for beginners? How tricky are zippers? Or 3D projects are just outright scary to folks.
And the answer is always NO!
You can totally make it all. Every single pattern is designed with beginners in mind. Maybe you have to be a little confident - trusting yourself. But you can definitely do it. Pinkie promise!
Never ever did someone not end up with a cute project. Fact!


But now. Here's the deal.
I was thinking to release a new series of patterns. A series of classic projects - covering the basics of bak making.
You'll learn lots of basic skills giving you the confidence to tackle everything. From zippers, to topstitching, drawstring mechanisms, sewing with tricky materials and quilting 101.
It's just skills! And YOU can learn them.

And the Quilted Boxy Pouch is the first one in the basics series.
But again. Let me start at the beginning.
This summer I bought (pretty much shop-bought and not handmade, don't judge me) this cute sequin zipper pouch (see below!). Sparkly and ohh so much fun. I carry it everywhere... my little disco bag.
And as I loved the size and shape (it's so roomy) - I decided to start with a classic boxy pouch for the basics series.

I know... it's nothing really new. And you can probably find 842 different patterns on Etsy covering boxy pouches. Nothing that hasn't been done before.
And that's ok.
This pattern is for two things really.
- learning new skills (how to insert a zipper, box out corners, piece those patchwork panels and quilt like a pro)
- and of course - by the end, you've made a super adorable little project that you can keep or gift
Like I've mentioned above. It's all about honing in on new skills. Giving you the confidence to tackle everything you wish!


Boxy Pouch Details
But let's talk about the Quilted Boxy Pouch a little more.
Shall we?
The pattern is absolutely scrap friendly, suitable for beginners (obviously) and best of all... it comes in three sizes. But let's break it down a little more.
- There are two versions! You can either make the whole cloth version (aka the outside of your bag is made of only one print) or go patchwork (aka using all your fave scraps to piece the outside panel, patchwork project but super simple). Both versions are covered inside the pattern.
- I show you how to insert a zipper with ease!
- How to box out corners (again... easy!).
- And finally, best of all - you can also watch the free video tutorial right here (see below).
Make sure to follow me on YouTube for more!


And this is what you'll need
Now let's talk about the materials a little more.
Shall we?
First of all - you will need your copy of the pattern which you can find in my shop. Remember, it's a measure and cut pattern, meaning all pattern pieces are cut using a rotary cutter, cutting mat and ruler. No need to print anything, unless you wish to do so. So you can start straight away picking your fabric!
And here the list with all the things you'll need:
- quilting cotton
- quilt batting
- zipper
- ribbon (optional)
- thread
- basic quilty notions
Fabric:
You will need fabric. Obviously. I like using quilting cotton (I yet have to make one using Liberty *eeeep*) but of course other fabric works as well. Whatever you have on hand. Ohhh... and for the patchwork version, this is a great chance for you to use up some of your most precious scraps. Just sayin'!
Quilt Batting:
Only two small pieces of batting are needed (roughly 13" x 8.5" for the largest one) - so you can totally use up some of your scrap batting. Leftovers from your last quilt. This is the one I am using for my quilts and therefore also for my boxy pouches, but any piece of batting works really.
Zipper:
I always use 10" zippers. Like ALWAYS. They are my absolute go-to zipper length for literally everything. Even for much smaller pouches... you can always chop off the ends of a plastic zipper, right?
Technically you can also use a 6" plastic zipper for the smallest size but again... you'll always find me using longer ones.
And now the tip: buy them in bulk! I order mine all the way from the US but they are here in absolute no time, super cheap if I buy a pack of a 100 or more and the colour choice is amazing (cotton candy pink, bubble gum pink and gray are my faves if you were wondering).
Ribbon:
Totally optional. But pretty ribbon can never be wrong, am I right? I like the plain off-white herringbone one a lot but of course, who can say no to pretty pink ribbons... And you only need a little (about 3" per boxy pouch).
Thread:
You will need thread. For the construction of the pouch, I am using Aurifil 50wt. That's for all the seams that are not visible later on but have to last.
And for quilting and topstitching along the zipper, I am switching over to Aurifil 28wt. That's for all the seams that are visible later on. The result looks super neat!
Find out more about thread and when to use which thread weight over on my blog post here.
Basic Quilty Notions:
And finally, you'll need some basic quilty notions. You probably have most of them already at home.
Make sure you have a large enough cutting mat, a ruler (an extra square one comes in handy for this project and is always used in my studio) and rotary cutter. And for marking your quilty lines, I would highly suggest to get a hera marker. It only ever leaves creases and no nasty stains behind!
And that's it. All you really need.
Ohhh and one last thing...
You might be delighted to know that you DON'T have to install any binding to inside of your boxy pouch. I know binding can be tricky to install and sometimes end up wonky - so the pouch is designed to make it super easy for you.
No binding needed. Guaranteed!


And of course - if you have any questions. Please don't hesitate to get in touch. I am only an email (laura@sweetcinnamonroses.com) away and here to help you.
Hope you'll love the Quilted Boxy Pouch as much as I do.
Best + big quilty hugs.
Laura x


This blog post contains affiliate links, specifically I am a participant in the Amazon Services LLC Associates Program, an affiliate advertising program designed to provide a means for us to earn fees by linking to Amazon.com and affiliated sites. I will never post a link to a product I do not personally recommend. If you click on an affiliate link and then proceed to purchase something from that affiliated website, I receive a small commission. This helps me continue to provide high quality, free content. Please send me an email to laura@sweetcinnamonroses.com if you have any questions.
1 comment
I made my first one and I love it! Onto a quilted one now. I would suggest in the tutorial you refer to the zipper as “right side up” as opposed to “teeth showing.” I see teeth on both sides! I had to unpick and redo as I did it wrong the first time. I thought I could tell from your photo but I really couldn’t. I watched the video to confirm how to do it.